Most small businesses need to use a photo from time to time, be it for a Web site, brochure or presentation. But most businesses don’t have an in-house art department to handle tasks like image editing, or the budget to spend a lot of money on a professional-level image-editing package.
But take heart: We found two downloadable applications and one online service that deliver the basics (or more), no money or previous experience required. Granted, these choices aren’t as powerful as the pro-level packages like Adobe Photoshop or CorelDRAW, but they are usable, approachable and, best of all, free.
Paint.net: Like MS Paint, but Useful
Everyone’s school project should turn out half this good: Paint.net began life as an undergraduate senior design project at Washington State University. Originally mentored by developers at Microsoft, the software was originally intended as a free replacement for the woefully underpowered MS Paint applet that comes as part of Windows.
Paint.net, now at version 2.72, is maintained by some of the alumni who originally wrote it. Designed to work with Windows 2000 or XP (and reportedly with the upcoming Windows Vista), this free download offers a wealth of painting and image-editing tools. Since there is no user manual, people familiar with other editing programs will be at an advantage. But even newcomers should be able to figure things out enough to get basic jobs done.
As the name implies, the utility requires that Microsoft’s .NET framework be installed on your PC. If it isn’t, or if you aren’t sure, the download page offers a choice that delivers both the program and .NET 2.0. Downloading the 48MB file takes just a few minutes over a broadband connection, after which you’ll be prompted to install .NET (which takes five minutes) and then Paint.net itself (a two-minute install).
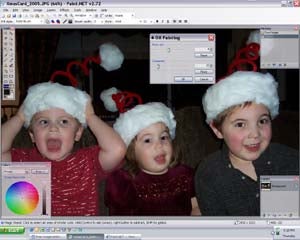 |
| Paint.net offers a good range of image-editing tools, though more contextual help would be useful for the non-artist types among us. |
The user interface is clean, though nothing revolutionary: Launch the program, and you’re presented with a blank rectangle surrounded by floating tool palettes marked Tools, History (which will list all of the actions you performed on an image), Layers and Colors (with a color wheel and grayscale bar). Hovering the mouse pointer over a tool gives the fairly descriptive tool name, but not a more complete description of how to use it as we’ve seen in other image-editing apps.
It was at this point we yearned for a quick-start guide or some piece of documentation. But it is the digital age, after all, so we opted for the good ol’ Help choice from the top menu. A Tutorials choice led to the Paint.net forums, where people have posted instructions on how to create all sorts of nifty effects — glass orbs, glow effects, drop shadows, 3D text and much more. So we simply opened a photo and dove right in.
As in Paint, you can use the drawing tools to create a new image file, with various brushes, fill options, shape tools and so on. Or you can open an existing art or image file to edit (the program supports PNG, JPEG, BMP, GIF, TGA and TIFF formats). One annoyance shared with Paint: There is no “Close” choice in the File menu. To close a file you are working on and move to another, you choose “Open” and are then prompted to either save the current file or not.
When working with photos, there are plenty of canned effects to jazz up your images. For example, there are four different blur effects, four distortion effects, embossing, a frosted-glass effect and even an adjustable effect to make a photo look like an oil painting. You’ll find cropping tools, naturally, as well as an effective red-eye removal tool. And unlike other entry-level editors, Paint.NET support layers, which lets you compose one final image from a “stack” of images that are blended together.
Novices will need a lot of trial-and-error to get the effects just right, as most let you choose the degree to which the effect will be applied. As you play with these, you’ll come to appreciate the unlimited undo levels in the History palette, which lets you undo recent changes sequentially (or scrap them all and go back to the original image).
While we would have preferred to see more contextual help, we were still able to get the results we desired with just a little playing around. Given the number of tools Paint.net delivers and the non-existent price, we won’t complain.
Adobe Lightroom (Beta): Free…for Now
Anyone looking for a bit more sophisticated product will want to check out the Adobe Lightroom Beta. Adobe is offering the program as a free public beta through January 31, 2007 at least, at which point it will likely become a for-pay product. While still a work in progress, Lightroom is nonetheless a full-fledged image-editing program aimed at pro photographers and serious hobbyists.
To get the program, you need to register with Adobe and answer a few survey questions about your primary profession and so on. You can then download either the Windows or Mac versions of the program alone (less than 10MB), or the program already populated with (copyrighted) sample images and projects (about 115MB). We chose to download and install just the program itself, a painless process that took just a couple of minutes.
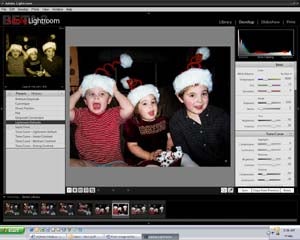 |
| The subdued interface of Adobe Lightroom makes it easy to concentrate on your art. |
Launching the program pops up a “Five Rules” dialog box that explains the workflow and interface of the program. The user interface, done in black, white, and shades of gray, is understated (yet attractive), and lets your eye train on the central image you are working on. Along the top right of the main interface you’ll find the words Library, Develop, Slideshow and Print, which guide you through the typical workflow for an image. Clicking on any of those changes the tool palette boxes to the right and left of your image, while a running Filmstrip along the bottom displays your image library at a glance.
Lightroom borrows a few organizational concepts from Adobe’s popular consumer-level Photoshop Elements editing/organizing package. The Library lets you see photos by shoot, by collection or by keywords or ratings you’ve assigned as you import them to the program from you’re My Pictures folder (or a camera or other location).
Picking an image from the Filmstrip and then clicking on the Develop tab brings up a range of color-centric editing choices (as well as cropping and straightening tools). Mouse over the list on the left, and the image preview above the list shows you the change before you commit to it. If you like what you see, click to apply it to the main image. We were happy with the default results, though advanced users will appreciate the complete control afforded by the sliders to the right of the image.
The Slideshow tab lets you create a slideshow from your selected images. You can chose to keep the photos original aspect ratio or switch to a widescreen format, set a backdrop color, set the duration for each image and more. With this beta, you can only export to PDF format (without sound), but we trust that will change in the final release. The Print tab gives you complete control over printing your images, including printing contact sheets and fine-art matte prints.
Adobe warns that Lightroom is not yet complete, but we still found more than enough functionality to correct and enhance photos. If you are more serious about your photos, we recommend downloading the Lightroom Beta before the free trial period runs out.
PXN8: Web-based and Basic
By far the simplest of the free utilities we surveyed is Sxoop Technologies’ PXN8(pronounced “pix-en-ate”). It really isn’t a utility at all, but rather a Web-based service: log on to the site, and you’re ready to go. We like that there’s nothing to download and install, though the editing tools the service offers don’t match those available from the full-blown apps we tried.
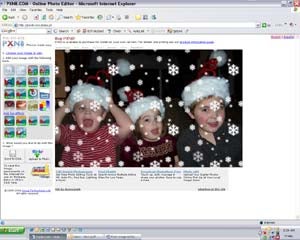 |
| The tool icons to the left have clear explanations and enable basic but effective image editing, all without installing a program on your PC. |
PXN8’s simple 1-2-3 instructions — choose an image to edit, edit the image using the tool icons displayed, then save the image to your hard drive (or a Web site) — help even newbies get started right away. Clicking on “Choose image to edit” opens a dialog box that lets you browse for images on your hard drive or connected camera. You then click on the “Upload this image” button, and in a few seconds (for a 500K 3.2-megapixel image over broadband) your photo appears in the large central preview area.
Mousing over the tool icons on the left side of the screen pops up a box with tool name along with a plain-English description of what it does, with no jargon. (For example: “Fill Light: This tool offers a quick fix for underexposed photographs. Just click to add light to dark dreary photos. Repeat until happy.”)
There are 14 tools (including fill light, red-eye reduction, sepia tone, zoom, resize and rotate), plus six effects (including blur and snow) that you can add. The undo button lets you cancel changes sequentially with a click. The tools were exceedingly easy to work with and performed as promised.
Granted, PXN8’s tools are no more extensive than you get with an online photo-sharing or photo-finishing service. But with PXN8, you don’t have to register or join anything: simply go to the homepage and start editing. That makes it a good choice for people who occasionally need basic image editing and don’t want the hassle of installing a program.
Jamie Bsales is an award-winning technology writer and editor with nearly 14 years of experience covering the latest hardware, software and Internet products and services.
| Do you have a comment or question about this article or other small business topics in general? Speak out in the SmallBusinessComputing.com Forums. Join the discussion today! |