When you create a PowerPoint presentation to play on a computer, it makes sense to take advantage of all the tools that you have at your disposal. One of these is PowerPoint action buttons. Action buttons let you add interactive elements to your PowerPoint presentations with very little effort.
You can use action buttons to create a navigation strip for moving around your presentation, and you can use them to open other slide shows and other documents. You can even use actions to play custom slide shows. PowerPoint includes a set of preset, preconfigured action buttons that you can add to slide shows or you can create your own custom buttons and add actions to them, if you prefer.
Action Basics
In PowerPoint 2003, you’ll find Action Buttons in the Slide Show menu. Choose Slide Show > Action Buttons, and you will see a set of twelve buttons, eleven of which are already customized for you. For example, select the Action Button: Help button and drag it onto a current slide. This help button comes preconfigured with a question mark on it. When the Action Settings dialog appears, click the Mouse Click tab and select the Hyperlink To option. Next you select a slide in your presentation that provides help information and link to it. To do this, click on the drop-down menu in the Hyperlink To box and select the slide from the Hyperlink Slide dialog.
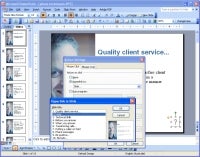 Link a slide to another that contains help information using the Action Button: Help Button. (Click for larger image). |
When you run your presentation and click the Action Help button, you will be taken automatically to this linked helper slide. You may wish to hide this helper slide so that it doesn’t appear in your slide show. Do this by right clicking it in the slide sorter and choose Hide slide. You will still be able to view the slide when you click the Action button, but it isn’t part of the normal presentation so, if the slide show recipient doesn’t click the button, she won’t see the slide by simply viewing the presentation.
Having created a link between a slide and a Help slide you may wonder how your slide show viewers will return to the slide that they were working on. This is easily done with another action button. Move to the slide with the help information and choose Slide Show > Action Buttons and select the Action Button: Return button. Click and drag the Return button onto your slide, and when the Action Settings dialog appears click OK to accept the default setting, which is Hyperlink To the Last Slide Viewed.
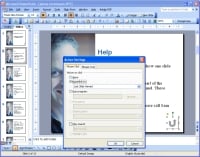 The Action Button: Return takes your audience back to the slide they viewed. (Click for larger image). |
Action buttons are simply AutoShapes, and they can be formatted to match the slide color scheme by right clicking the button and choose Format AutoShape > Colors and Lines tab and set the Fill Color as desired.
To test the buttons, choose Slide Show > View Show. When you get to the slide with the help button on it click the button, and you will be taken to the help slide. When you want to return to the presentation, click the return button to go back to the slide from which you came. Action buttons do not affect the rest of your presentation, and they simply give you a way to navigate through the show in a nonlinear manner.
Image Maps
You can also use action buttons to create image maps for a slideshow much as you might create an image map on a Web page. In this case you will present your viewers with a number of options on a single slide and then hyperlink each option to a particular slide in the presentation or perhaps even to a different presentation.
To create a slide show image map first select and insert an image on your slide. Use the shapes tool from the Drawing toolbar’s AutoShapes collection to draw a shape over that portion of the image that you want to be clickable. You can select a rectangular or circular shape or use one of the freeform drawing tools to draw an irregular shape. When you have completed the shape, right click it and choose Action Settings. This displays the same action setting dialog that you have been using.
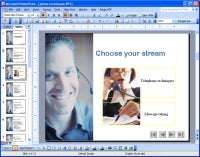 This presentation has an image with shapes placed over it. Each shape is linked to a custom show. (Click for larger image). |
Select the Hyperlink To option and then select what you want to hyperlink this particular part of the slide to. You can hyperlink to any slide in your current presentation, to a Custom Show, to another PowerPoint presentation or to another file on your computer — for example an Excel worksheet or a Word file. When you have selected the option, click OK.
Continue and add other shapes to your image and attach actions to them as desired. One application for this image map concept is to run custom shows which you have created by selecting Slide show > Custom Show. Create a slide with the various options on it and your viewers can choose the show they want to play by clicking the appropriate part of the image.
Configure a Quiz with Action Buttons
Other options for using action buttons include managing a quiz in a self-navigated presentation. If you’re creating a training presentation, you can insert a quiz slide at various intervals throughout the presentation. Ask a question of your viewer on the slide and offer two or more buttons with alternative answers on them – these can be custom buttons with text or images placed over them. Link the answers to various slides using Action settings. Depending on the button that viewers click in response to the question, you can return them to the slide with the information that they have misunderstood or continue their progress through the training presentation.
Navigation Systems
Another way to use action buttons is to create a navigation system for a slide show. In this situation you will place navigation buttons on each slide in the presentation so that a viewer can click a button to progress forward or backward through the presentation.
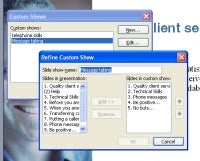 If you have custom slide shows, you can link each to a separate action button. (Click for larger image). |
To do this create the navigation system on your slide master by choosing View > Master > Slide Master. Then choose Slide show > Action Buttons and add the Action Button: Back Or Previous, the Action Button: Forward Or Next and, if desired, the Action Button: Beginning and Action Button: End to the slide master. You can adjust these action buttons to quite a small size. Be sure to place them in a position on the slide where they will not be hidden by other slide content later on.
Placement is important because the elements you place on the slide master will appear underneath everything else on the slide and cannot be raised above them. Because of this you don’t want other elements on your slide to sit over the top of your navigation system or the navigation system simply won’t work.
When you are done click Close Master View to continue. You may notice that the navigation options on the first and last slides are not technically correct. There is no previous slide to the first slide in the presentation and on the last slide of the presentation there is no next slide.
You can either leave the navigation as is – leaving your viewers to click on a button that won’t take them anywhere, or you can cover these buttons on the first and last slides with an AutoShape that will disable them. Provided you have a plain slide background you can create a shape that sits over the top of the action buttons — hiding them from view and effectively disabling them. If not, you can place another action button (such as one linked to a Help page) over the top of the navigation button you want to disable.
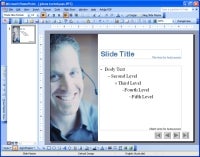 Add a set of action buttons to a Slide Master to create a navigation system that will appear on all slides in the presentation. (Click for larger image). |
Action buttons can do things other than simply display slides. You can, for example, configure an action button to play a sound when the mouse is held over it. To do this right click an action button, choose Action Settings and then the Mouse Over tab.
The Mouse Over tab has options that will be invoked if the viewer holds the mouse over the action button. It is best not to use the Hyperlink To option to hyperlink to a different slide using the Mouse Over event because the viewer may hold the mouse over the action button in error, and you don’t want her moving to another slide when she didn’t intend to do this. You do, however, have a Play Sound option available that will let you, for example, configure an action button so that a sound will play when the viewer holds the mouse over it.
Action buttons offer a way to add interactivity to your PowerPoint presentations. Action Buttons and Action Settings can help when you want to navigate a presentation other than by one slide following the other.
Helen Bradley is a respected international journalist writing regularly for small business and computer publications in the USA, Canada, South Africa, UK and Australia. You can learn more about her at her Web site, HelenBradley.com
| Do you have a comment or question about this article or other small business topics in general? Speak out in the SmallBusinessComputing.com Forums. Join the discussion today! |

